Learning FE
Getting Started
In my opinion, you need a sample XML data file target to start – even if it is an empty one.
Make sure that your sample XML data file has the usual DocOrigin structure. That is...
<?xml version="1.0" encoding="utf8"?>
<XmlData>
	<Document>
		... more if you have it
	</Document>
</XmlData>
FE normally looks for the <Document> tag, but you can specify a different tag name when you create a new filter.
Here is a sample collateral of an empty XML to start with empty.xml
If you start with an empty XML data file, you should first add as many data field element names as you can, including any desired XML structure. This then gives you target fields to place your extracted data from the flat textual input you are dealing with. You can add more fields at any time, but it is surely best to have the field added before defining the extraction that fills it.
Sample XML File
You NEED a sample XML target file.
We are about to answer the age-old question of which comes first, the egg or the chicken.
In the absence of the provision of sample target XML collateral, the form design comes first.
The form design is your ticket to getting a sample target XML file. With that XML file, and subject matter expertise (no getting around that), you are on your way to a productive FilterEditor session. Without it, you are on your way to hair loss.
You are extracting the data so as to present it in a professional document format, i.e. to present it as merged into a form (document) template. So there is no loss in designing the form first, and a lot of gain. The first iteration of the form design need not be the ultimate in layout perfection, but it will set the framework of which data items are needed and whether they are in panes that are allowed to (expected to) occur multiple times. With even just that much of the form design done, you have taken a giant stride. I aver that you now know more about your ultimate document presentation objective; you know exactly which data fields are needed, and by virtue of Design's ability to create and save a data file with automatic contents that reflect the expected data structure, you have the grail of the mandatory target XML data file for your FE "ride".
In fact, using the sample data produced for a form design is such a common operation that FE now allows you to specify an XATW file as the sample XML file. FE doesn't interpret that literally. If the user has chosen an XATW file, FE will cause sample data for that form file to be produced and will then use that generated sample XML as sample XML to assist in creating your filter.
Acquire subject matter expertise
Design the target form
Use auto-data generation to get a sample data file
NOW, start FE, and load up that XML file, and load up the print/overlay/spool source file
You are on your way to a rewarding FE session.
Show Those Menu Items
There is a Microsoft standard, user-configurable option for determining whether the menus in an app automatically show all their entries right away or instead show only recently used menu entries. You are learning. You need to see all possible menu items right away. You will see things that intrigue and inform you. You want to see all menu items when you are learning any app.
Use View > Toolbars and Docking Windows > Customize... – choose the Options tab.
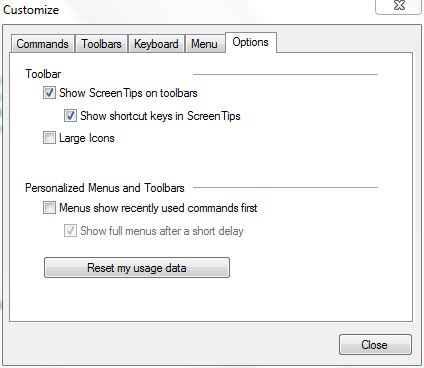
FE Show full menus
Ensure that Menus show recently used commands first is unchecked. Now you have a hope of learning.
Filter Editor - 101
For your first real FE session, after you wasted your time looking at a goulash of samples. (I told you not to), you launch FE. You do a File – New You will see:
FE Designing a new filter
Supply the name of your overlay/print/spool text "source" file. One that you understand and have the needed subject matter expertise for.
Supply the name of the XML file that you saved from Design using your initial form design, the one that is the eventual target of the data you are about to scrape off of the above source file.
Now you're cooking.
If you can't supply those two things, you are not ready for FE 101.
How Does It Work?
In FilterEditor, you define Rules and Actions. Each Rule is really a specification of something to look for in the coming lines of the source file. I call it looking for a sentinel. An Action is, at least 99% of the time, an extraction, that is to grab some data off of the source file and put it in the target XML file. FilterEditor in a nutshell is "Find sentinel, extract, extract, extract", "Find sentinel, extract, extract, extract", ...
Defining a Rule
Look over the central source file canvas area. Do you see some string of text that indicates the beginning of (or at least anchor point for) a section of the report? Select that text with your mouse or shift-arrow keys. Now right click that selected text and choose: Add Rule. FE will add a Rule for you. You will see it in the right-hand panel which is named "Filter Rules". It will look something like this.
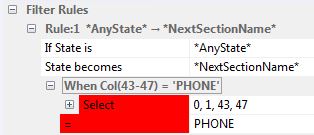
FE Defining a Rule
Your job is to type overtop of *NextSectionName* to provide the name of the State that you believe the detection of this sentinel puts you in.
You [have a] Rule!
Defining an Extraction
Back to the source file. Do you see a piece of text that should be "scraped off" as a value for a field? Select that text by mouse or shift-arrow keys and right mouse click it. In the context menu choose Extract Data.
A data extraction Action will be added below your Rule. It will look something like:
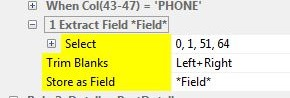
FE Defining an Extraction
Your job is to replace the *Field* entry with the name of an actual field in your XML file. That's easy because you have a dropdown of the entire XML structure to pick from.
Review
- You have added a Rule.
- You have added a Data Extraction
Uh, that's all there is! Easy! Add more data extractions. When you have extracted all the data you can based on the current sentinel, select the text for another sentinel, and Add Rule. Repeat, repeat, repeat.
Rule order
The Rules are processed, top to bottom. The first one that finds a sentinel wins, and the extractions related to that found sentinel are done. Don't worry about the order of Rules right away. It is terribly important but there is a Move Up/Down capability so you can work the order out later.
States
When one of your Rules finds a sentinel, it always sets a State name. In fact, each Rule is of the form If State is xxx, then look for this sentinel. This is very important. You may have hundreds of Rules defined, but only the Rules that apply to the current State of the line being scanned matter, the others are skipped. So it is not a free-for-all of looking for every possible sentinel all the time. It is controlled; look for only those sentinels that apply to the State the current line has, and if you find one, you most likely go into a new State, where different Rules apply. In essence you "walk" down the source file going from State to State.
A tiny update. In fact, you can provide a comma-separated list of If State is States, but the effect is still the same. Not all Rules apply, only those pertinent to the State the current line is in.
The *Start* State
FilterEditor always begins in the *Start* state. This can be a convenient state to use when looking for something at the top of the file. Using the *AnyState* state would check such a rule on every line. But the *Start* state is very specific to the top of the file.
The *AnyState* State
There is a special "pseudo" State with the name *AnyState*. The *AnyState* State means 'I don't care what State the current line has'. If my Rule says "If State is *AnyState* ..." then that Rule applies regardless of what the current State of the line being scanned is. Because such rules are so widely applicable, they are generally placed at the bottom of your list of Rules. Rules which are state-specific should precede those that are "any old state" non-specific. Use the Move Up/Down feature available as a right mouse click context menu on Rules to reorder your Rules, highly specific up top, highly general at the bottom.
The Current Line
Unsurprisingly, FilterEditor (FE) has a concept of the current line. That current line can move only forward, never back up a few lines, inexorably forward. Sometimes this is also called the anchor line. To begin with, FE reads the first line of the source file. It then cycles through all the Rules that apply to see if this line has a sentinel in it. If it doesn't, it moves on to the next line and repeats running through all applicable Rules. Eventually, it finds a sentinel. Once a sentinel is found (FE has matched the Rule's State name to the line's current State and the "Test" has succeeded), the Rule's Actions (if any) are performed. Typically these actions are Extractions of field data. Once the Actions are complete the current State changes to the one specified in the Rule as the "State becomes" name. The "current line" is advanced by 1 to the next line in the source file, and the whole process cycles again.
Extractions
Once a Rule has successfully matched the current line in the source file, you can add Extraction definitions which tell FE how to take data fields from the source file and store them into the XML file.
Extractions are not bound by the endlessly forward movement of the current line, nor are they bound by one line at a time inspection. Extractions specify relative line and absolute column ranges. They can reach back to before where the sentinel was found, using a negative line number. They can reach forward as many lines as necessary to nab the data of interest. Having found a sentinel, a guidepost, you can pick data from all over the place relatively speaking. Think of a "header" section of a report – it's probably multi-lines long. If your Rule has found a sentinel that indicates the presence of that "header", then you will likely want to do extractions of many fields from that header area. Do so – you don't need to find more sentinels within the already identified header area.
Doing an extraction has no effect on FE's notion of the current line. However, one Action that you may choose to include after doing a bunch of extractions from an identified header area is to Advance n lines so as to skip over the rest of the header area before starting to look for sentinels again.
Variable Length Extractions
This is advanced material. Please skip it until you have had a good deal of experience with FE.
Per the above, you can specify the exact columns and lines that you want to extract. But what if the number of lines varies. A classic example is to want all the description lines up to the next detail line header. A Custom JavaScript function could certainly get you there but the span action step may be sufficient.
- Select the first line of the data to be extracted. Leave the number of lines at 1.
- Right-click the Select line of the extraction definition.
- Choose the Add Action Step context menu entry.
- Select the
Span only if not=offering. - Fill in the column start and end arguments and the text that will terminate the selection, e.g. text that occurs in the next detail line header
You will now be selecting as many lines as exist until the 'sentinel' that you identified occurs.
Depending on your circumstances you may choose to use the "Span only if =" offering.
Moving On
When all the extractions defined for this 'sentinel find' are done, it's time for FE to resume looking at the next line to see if it can find any applicable sentinels in it. Just as it was doing when it started out. It may seem that with all the extractions that just went on, the current line is all "picked over". Irrelevant. Extractions from a line have no bearing on a line's still being subject to sentinel searches. Line-by-line, that current line will move forward, and each line will be searched for sentinels that apply for the then current State. (An explicit Advance n Action can jump the current line ahead by more than 1.)
Filling In the XML
When you define an extraction, aside from selecting the area on the source file to be scraped off, you also nominate a target element in the XML file. Initially that's dead easy. But eventually you are going to do an extraction that wants to go into a data element that you already put stuff into. Now what? When this happens, FE will automatically make a duplicate empty copy of the parent XML structure including all it's child nodes. This in effect creates a duplicate "record" for more data. The element that you just scraped off the source file now has a home to go to. And the upcoming sibling scrapings also have fresh new homes to go to. It's really quite a simple process, but you do need that target XML to make it feasible.
XML Output Data Structure with Multi-Instance
(As of 3.2.001.07)
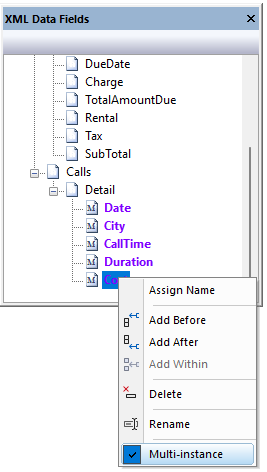
In cases where a target form has multiple fields with the same name that are not global, it may be desirable to adjust the XML Output Data structure by marking select nodes in the XML Data Fields as “multi-instance”.
This can be done in the XML Data Fields by right-clicking on a node and selecting “Multi-instance”. Instead of Filter Editor automatically creating a duplicate empty copy of the parent XML structure, including all its child nodes, FE will duplicate the child nodes as many times as necessary within a single set of parent node tags.
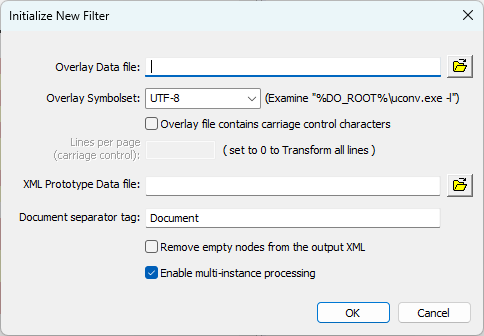
You can define the “Enable multi-instance processing” when you Initialize the xFilter for the first time or set it in the File > xFilter Properties menu.
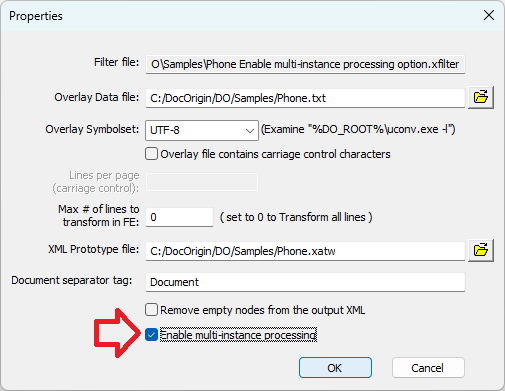
xFilter Properties > Enable multi-instance processing option
Note that for backward compatibility, “Enable multi-instance processing” must be selected in the File > xFilter Properties menu to activate the XML restructuring. The option is shown "On" in the previous screenshot.
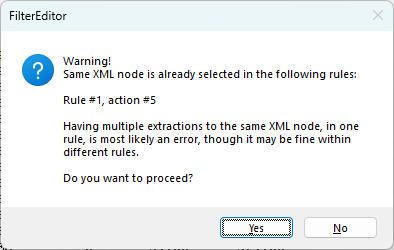
When a user assigns an extraction to a field that is already mapped, DocOrigin will prompt a Warning to confirm the user wants to proceed.
The results will be very different based on the option you choose. The table below shows the same overlay file with the same XML structure, but one shows the results when the Enable multi-instance processing option is "On," and the other shows the results when it is "Off".
| Enable multi-instance processing option "On" | Enable multi-instance processing option "Off" |
|---|---|
<Detail> <Date>03-11-2001</Date> <City>Santa Barbara</City> <CallTime>15:24</CallTime> <Duration>50</Duration> <Cost>5.50</Cost> <Date>03-23-2001</Date> <City>Billerica</City> <CallTime>10:15</CallTime> <Duration>7</Duration> <Cost>.50</Cost> <Date>03-27-2001</Date> <City>Reno</City> <CallTime>10:15</CallTime> <Duration>50</Duration> <Cost>5.50</Cost> | <Detail> <Date>03-11-2001</Date> <City>Santa Barbara</City> <CallTime>15:24</CallTime> <Duration>50</Duration> <Cost>5.50</Cost> </Detail> <Detail> <Date>03-23-2001</Date> <City>Billerica</City> <CallTime>10:15</CallTime> <Duration>7</Duration> <Cost>.50</Cost> </Detail> |
Non-Extraction Actions
Not quite every Action is an extraction. Some Actions may have nothing to do with text selected on the source file. They are just things that you want to have happen whenever this Rule fires. In the Filter Rules panel, right mouse-click on a Rule, and choose Add Action. You will get a dialog that identifies a set of Actions that are available. Choose one and it will be added to the list of actions (including extractions) that are performed when the Rule is triggered.
Start New Document
The xfilter processing automatically gives you a start-new-document tag, i.e. <Document> at the start of the XML file. However, if the report you are scraping can contain multiple documents' worth of data, then you should (must!) include a Start New Document Action in some Rule. A classic would be the detection of "Page 1" somewhere in the source file. There must be some means by which you can identify when a new document's information begins. Use that to define a Rule and add the Start New Document Action to that Rule.
Extraction Steps
You will immediately notice that an Extraction (really a special kind of Action) is not a "one-liner". In fact it is a macro that revolves around the text that has been selected on the extraction. It could be that you will want to "fiddle with" that extracted text before you stuff it into an XML element. As a strong default, FE automatically does a "Trim blanks" Step. It then does a "Store as Field" Step. This is what you want, and all you want, most of the time. But you can get adventurous by right-clicking on the Extraction line, and choosing "Add Step". It brings up a dialog of available steps. It's much like, and even overlaps the dialog for "Actions", but it is different. The steps are generally ones that involve the text that was selected for the extraction. You can add as many steps as you like. You can delete them too. It is remotely possible that you might even delete the "Store as Field" step.
The Lexicon
Rules are Rules; order matters; find a sentinel
Extractions – a common, specific type of Action.
Actions – especially non-extraction Actions. One-liners: 'take this action'
Steps – apply to only Extractions; used to play with the nominated text in some way
State – the data transformation process always maintains a current State name. this State name is matched against the State defined in each Rule to determine which Rules to execute. After execution of a Rule's Actions, a new current State is set.
Sentinel Detection
A Rule automatically gets a When clause that refers to the sentinel text that you highlighted and specifies an equal (=) condition. That's almost always what you want. However, all those arguments of the Rule are editable by you. You don't have to go precisely by the text that you had highlighted; you can freelance it. In particular, one sometimes wants to change that equals to 'not equals'. You can do that by right mouse clicking the = and choosing Change Test. You'll find an interesting selection of tests to choose from. They are all meant to provide a true/false result. You might want to study them sometime, but mostly only for keeping in your back pocket.
Ways Into a State
Sometimes there is more than one way to get into a State. But you have a strong desire to express the Extractions for that State in only one place. The classic example that we hit is coming from State "A" to a Detail line, then being on a Detail line, wanting to get to the next Detail line. You could open it up completely and express your rule as.. If State is *AnyState* etc, but that might be a bit too open, a little unnerving even. Instead, you can claw back control by keying in a comma-separated list of States so that you end up with something like: If State is A,Detail etc. That way your sentinel selection is predicated on a chosen list of current States, not the open-ended *AnyState*. It works quite well.